How to Accept Crypto Payments on WooCommerce (2026 Setup Guide)

You can add crypto payments to a live WooCommerce store in about 15 minutes, and the fastest path is the official aurpay-for-woocommerce plugin from WordPress.org. Install it, paste one Public Key from your Aurpay dashboard, switch on the coins you want, and your checkout starts accepting BTC, Bitcoin Lightning, ETH, USDT (ERC-20 + TRC-20), USDC (ERC-20 + TRC-20), DAI (ERC-20), and BNB. No code, no contracts, no banking details to hand over.
The reason this setup is worth doing is the economics. A typical card transaction costs you 2.9% + $0.30 and takes two to three days to clear. Aurpay charges a flat 0.8% per transaction, settles on-chain in minutes (milliseconds on Lightning), and is fully non-custodial, so funds land directly in your own wallet instead of sitting in a gateway’s account where they could be frozen or delayed.
Here is the short version before the full walkthrough:
- Plugin: aurpay-for-woocommerce on WordPress.org, currently v2.0.0, tested up to recent WordPress and WooCommerce releases (check the plugin page for the latest compatibility line at install time).
- Setup time: ~15 minutes — install, paste Public Key, enable coins, test, go live.
- Fee: 0.8% flat, no monthly fees, no contract.
- Coins: BTC, Lightning, ETH, USDT & USDC (ERC-20 + TRC-20), DAI, BNB.
- Custody: 100% non-custodial — your wallet, your keys, no chargebacks.
- Stablecoin tip: prefer TRC-20 for frequent small orders (network fee ~$0.50–$2 vs $3–$35 on ERC-20).
WooCommerce powers 33.4% of all ecommerce sites — roughly 4.53 million active stores — yet by default none of them can take a single satoshi. With 4 in 10 U.S. merchants now accepting crypto and 88% reporting customer inquiries about it, closing that gap is a concrete revenue decision, not a hobby project.
What You Need Before You Start
This setup has three prerequisites, and getting them ready first means the install itself takes minutes. None of them require technical skill beyond copying and pasting a key.
- A current WooCommerce and WordPress install. The plugin requires WordPress 5.8 or higher and is tested against recent releases, so any reasonably up-to-date store qualifies. Check under Dashboard → Updates if you are unsure.
- An Aurpay merchant account. Create one at dashboard.aurpay.net. There are no contracts or banking details required to open the account.
- A receiving wallet for each coin you plan to accept. A hardware wallet or MetaMask works fine. You set these receiving addresses once inside your Aurpay dashboard — not in the WooCommerce plugin itself. Because Aurpay is non-custodial, confirmed payments route straight to those addresses, and you control the keys at all times.
If you only want to accept one or two coins to start, you only need wallets for those. You can always add more later from the same dashboard. The WooCommerce plugin itself never touches your addresses — it only needs the Public Key, which links your store to the dashboard where the addresses live.
Step 1: Install the Aurpay WooCommerce Plugin
From your WordPress admin, go to Plugins → Add New and search for aurpay-for-woocommerce. The current release is version 2.0.0, kept current with recent WordPress releases, so it will not throw a compatibility warning on an up-to-date store.
Click Install Now, then Activate. That is the whole installation. Unlike self-hosted options such as BTCPay Server, there is no server to provision, no node to sync, and no SSL certificate to manage — the plugin handles the connection to Aurpay’s settlement layer for you.
Step 2: Connect Your Aurpay Dashboard
Log into dashboard.aurpay.net and open your store project. You are looking for one value: the Public Key. Copy it.
This is a public key, not a secret — it is safe to store inside the plugin settings, and on a standard install it is the only value you paste into WooCommerce. The non-custodial design means there is no secret API key controlling your money on a third-party server. The Public Key is what ties your store to your dashboard, so when Aurpay confirms a payment on-chain it knows which store to notify; the underlying smart contract settlement mechanism then routes the confirmed payment directly to the wallet addresses you set in the dashboard. If your hosting blocks incoming callbacks, you can also poll order status from the dashboard, but most stores never need to.
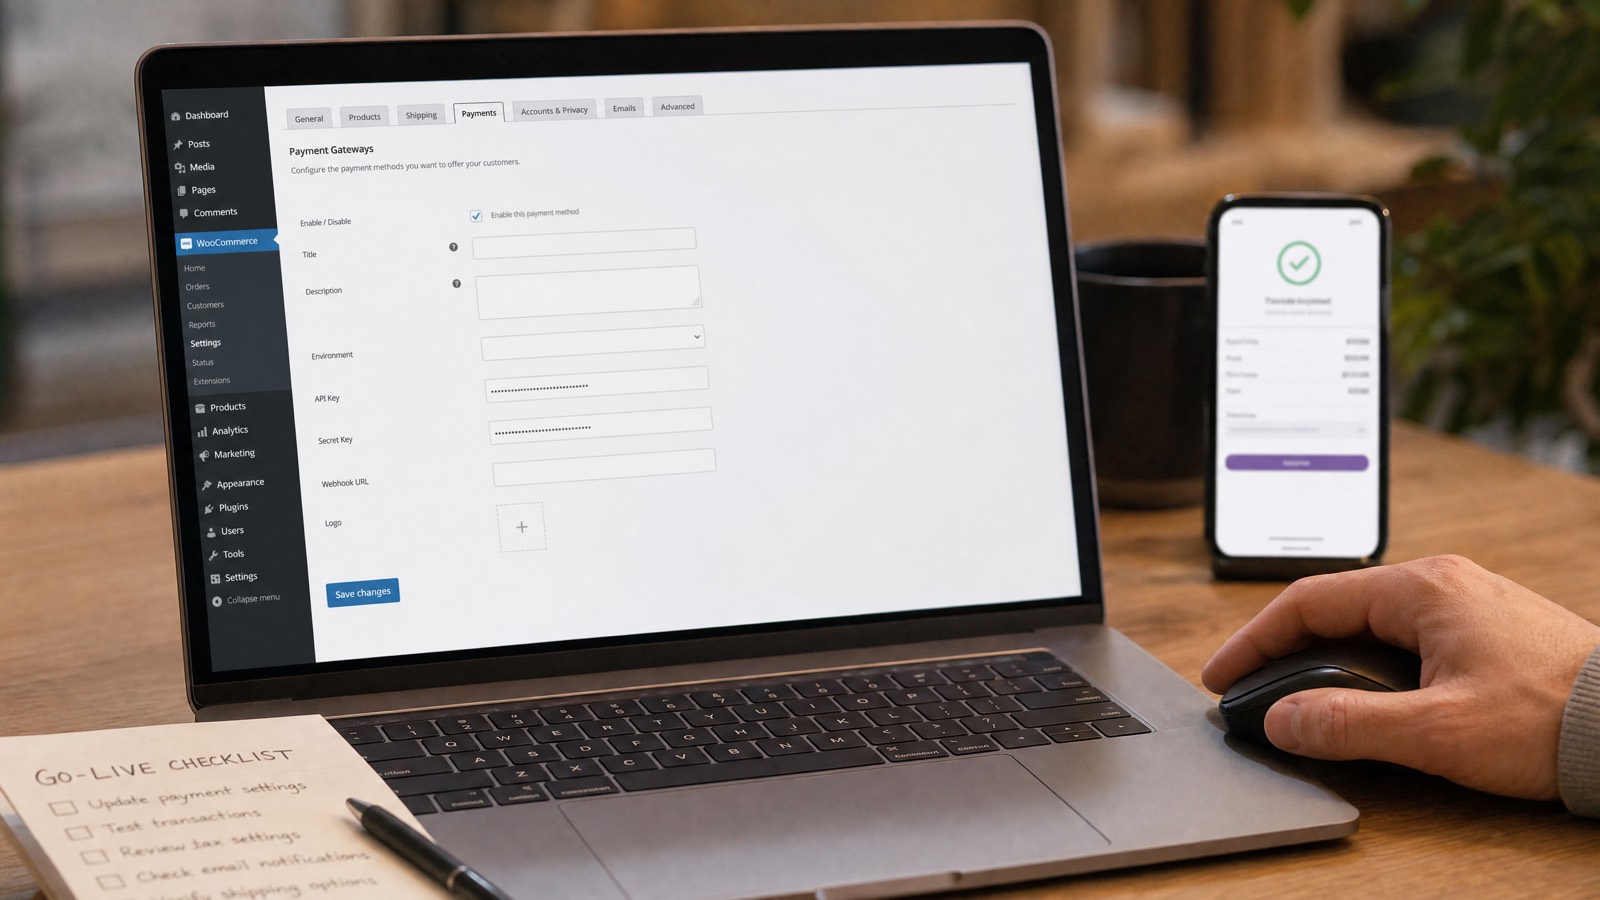
Step 3: Configure the Plugin in WooCommerce
Navigate to WooCommerce → Settings → Payments. You will see a new entry, Aurpay Cryptocurrency Payment. Toggle it on with the Enable switch, then click Manage.
Paste your Public Key into the field provided and click Save. While you are on this screen, set the payment method title your customers will see at checkout (for example, “Pay with Crypto (BTC, USDT, Lightning)”) and an optional description. Clear, specific wording here measurably improves conversion — shoppers are more likely to click a button that names the coins they hold.
Step 4: Choose Which Coins to Accept (and Why It Matters)
Aurpay supports BTC, Bitcoin Lightning, ETH, USDT and USDC on both ERC-20 and TRC-20, DAI on ERC-20, and BNB. You do not have to enable all of them — pick the set that matches your customers and your order sizes. The single most consequential choice is which network you use for stablecoins.
USDT and USDC exist on multiple networks, and the network determines the fee your customer pays to send the payment. TRC-20 transfers on Tron cost roughly $0.50–$2 — and an August 2025 network change (Tron Proposal #104, which halved the energy unit price) pushed them lower still — while ERC-20 transfers on Ethereum run $3–$35 in normal conditions and occasionally spike higher at peak demand. For a $40 order, a $20 ERC-20 network fee is a deal-breaker for the buyer; the same payment on TRC-20 costs cents.
| Coin / network | Best for | Network fee (paid by customer) | Settlement speed |
|---|---|---|---|
| Bitcoin Lightning | Orders under $200 | Near-zero | Milliseconds |
| USDT / USDC (TRC-20) | Frequent small-to-mid orders | ~$0.50–$2 | 1–3 minutes |
| USDT / USDC (ERC-20) | Larger orders, ETH-native buyers | ~$3–$35 | 1–5 minutes |
| BTC (on-chain) | Widest recognition, higher-value orders | Variable | 10–60 minutes |
| ETH / DAI / BNB | DeFi-native and decentralized-stable buyers | Network-dependent | 1–5 minutes |
For most WooCommerce stores, a sensible default is: enable Bitcoin Lightning for small orders, USDT and USDC on TRC-20 for everyday stablecoin payments, and BTC for the buyers who want to pay with the asset they recognize most. Add ETH, DAI, and BNB if your audience skews DeFi-native. If your store is Bitcoin-focused specifically, the dedicated walkthrough at accepting Bitcoin payments on WooCommerce covers that path in more detail.
How the Checkout Looks to Your Customer
When a shopper selects your crypto payment method and places the order, Aurpay generates a QR code at the real-time exchange rate for the coin they chose. The customer scans it with any wallet — no Aurpay account, no signup, no app download required on their end. On-chain confirmation then triggers WooCommerce to update the order status automatically, so a paid order flips to processing without you touching it.
This matters for conversion. 90% of merchants say they would accept crypto if the experience matched card payments — and a scan-to-pay QR flow is about as close to that as it gets.
How Bitcoin Lightning Payments Work on WooCommerce
Lightning is the option to enable if you sell lower-value items. It is Bitcoin’s second layer: the network now processes 12M+ transactions monthly across 18,000+ active nodes, confirming payments in milliseconds rather than the 10–60 minutes of an on-chain Bitcoin transaction. Network fees are effectively negligible.
The customer experience is the same scan-to-pay QR, except the payment clears almost instantly. In your dashboard the transaction appears immediately as confirmed, and the WooCommerce order moves to processing right away — no waiting through block confirmations. For coffee-shop-sized orders, digital downloads, or anything under $200, Lightning gives the cleanest checkout of any crypto method. Aurpay lets you receive these payments; it does not run nodes or channels on your behalf, which is exactly why there is nothing for you to operate.
Step 5: Place a Test Order Before You Go Live
Never flip a payment method live without testing it. Aurpay provides a demo storefront at example-wp.aurpay.net so you can see the full flow end to end, and you can run a real small-amount transaction on your own store to confirm your specific configuration works.
Place a low-value test order, pay the generated QR with the coin you enabled, and watch the WooCommerce order. A successful confirmation looks like this: the payment registers in your Aurpay dashboard, the webhook fires, and the order status updates from pending to processing on its own. If that chain completes, your integration is wired correctly and money will land in your wallet on every real order.
Handling Underpayments, Overpayments, and Refunds
Crypto payments occasionally arrive for the wrong amount — a customer mistypes, or a network fee eats into the sent total. The plugin handles all three edge cases so you are never left guessing.
- Underpayments: the plugin offers two choices — mark the order resolved as-is, or request the remaining balance from the customer.
- Overpayments: Aurpay handles these automatically, so the order completes without manual intervention.
- Refunds: issue a partial or full refund directly from the WooCommerce order screen, the same way you would for any other payment method.
If you ever need to bill a customer outside the normal cart flow — say, a custom quote or an overdue invoice — Aurpay’s separate crypto invoice product lets you send a price-locked payment link by email or SMS.
Go-Live Checklist
Run through these eight items before you announce crypto payments to your customers:
- Public Key saved in the plugin settings.
- At least one coin enabled with a wallet address attached.
- A test order placed and confirmed flipping to processing.
- Payment method title set to something specific at checkout.
- A crypto-accepted badge added to your product or cart pages.
- Free Merchant Directory listing submitted — it lists your store alongside other crypto-accepting merchants to help shoppers find you.
- Yoast/SEO description updated to mention crypto checkout where relevant.
- TRC-20 confirmed as your default stablecoin network for low-value orders.
The Fee Math
The reason most merchants adopt crypto checkout is cost. At a flat 0.8%, Aurpay sits below every major card processor and below most crypto gateways too. Compared with card processing at 2.9% + $0.30, that is roughly $2 saved per $100 order, and Aurpay batches the on-chain gas it pays to move ERC-20 settlements, which keeps that overhead low even when Ethereum fees spike.
| Processor | Fee | Cost on $10,000/month | Custody |
|---|---|---|---|
| Aurpay | 0.8% flat | $80 | Non-custodial |
| NOWPayments | 0.5% headline (~1% effective after conversion) | ~$100 | Non-custodial flow (auto-forwards to your wallet) |
| CoinGate | 1% | $100 | Custodial settlement |
| Coinbase Commerce | 1% | $100 | Self-custodial, on-chain (settles to a merchant-controlled wallet on Base) |
| BitPay | 1–2% + $0.25 fixed | $100–$200+ | Custodial settlement |
| Stripe (cards) | 2.9% + $0.30 | ~$290+ | Custodial settlement |
Across a year at $10K/month, the gap between Aurpay and the alternatives ranges from about $120 to $2,100. For a deeper side-by-side of gateways on WooCommerce specifically, see our comparison of the best crypto payment gateways for WooCommerce. With crypto moving into mainstream checkout — PayPal’s January 2026 survey found 4 in 10 U.S. merchants now accept digital assets — the saved fee compounds as crypto’s share of your revenue grows.
Is This Compliant? GENIUS Act and Stablecoins in 2026
Accepting USDT and USDC in 2026 happens inside a federal framework. The GENIUS Act, enacted July 18, 2025, with OCC proposed rules whose comment period closed May 1, 2026, brings payment stablecoins under a federal regime and explicitly includes a merchant discount carve-out that allows you to offer discounts for stablecoin payments.
Because Aurpay is non-custodial — funds settle directly to your wallet rather than passing through a gateway intermediary’s account — a typical merchant taking pass-through crypto payments does not take on the money-transmitter obligations a custodial intermediary would. This is general context, not legal advice; consult counsel for your specific situation, especially if you operate at enterprise scale, where PayPal’s 2026 survey found 50% of large enterprises already accept crypto versus 34% of small businesses.
Frequently Asked Questions
Do my customers need an Aurpay account to pay?
No. At checkout the plugin shows a QR code at the live exchange rate, and the customer scans it with any crypto wallet they already use. There is no signup, app download, or account creation on the buyer’s side — they scan, send, and the order confirms on-chain.
Which stablecoin network should I default to, TRC-20 or ERC-20?
TRC-20 for most stores. Network fees run roughly $0.50–$2 on TRC-20 versus $3–$35 on ERC-20, which makes a large difference on smaller orders. Offer ERC-20 as well for buyers whose stablecoins live on Ethereum, but set TRC-20 as the path of least friction.
Is my money ever held by Aurpay?
No. Aurpay is fully non-custodial — confirmed payments settle directly to the wallet addresses you control, and you hold 100% of the private keys. No intermediary account holds your funds, so there is no freeze or delay risk, and because blockchain transactions are irreversible there are no chargebacks.
What does it cost to run the plugin?
The plugin is free to install, and there are no monthly fees or contracts. You pay a flat 0.8% per transaction — that is the whole cost. No banking details are required to open your Aurpay account.
Can I accept Bitcoin Lightning on a normal WooCommerce store?
Yes. Enable Lightning in the plugin and customers can pay with millisecond confirmation and near-zero network fees, ideal for orders under $200. Aurpay lets you receive these payments without running any Lightning node or channel infrastructure yourself.
I need a payment option outside the WooCommerce cart — what are my choices?
Aurpay offers a no-code hosted checkout page and an embeddable crypto payment button for collecting payments outside your store’s cart flow. Developers who want to customize further can build against the REST API.
Start Accepting Crypto on Your WooCommerce Store
Installing the Aurpay plugin is a 15-minute task that permanently lowers your processing cost to a flat 0.8%, settles funds straight into your own wallet, and opens your checkout to every major coin from Bitcoin to USDT. See the full feature set and download the plugin on the Aurpay WooCommerce product page, then run a test order and go live. If you want to earn on referrals, Aurpay’s affiliate program pays a commission for each merchant you send our way.
